Uploading Screenshots from e2e tests
After setting up the API User (Create Client Credentials), GitHub Actions can capture screenshots with Cypress, Playwright, or other e2e testing tools. The Webshot Archive GitHub Action will upload the screenshots to the Webshot Archive API and comment on the Pull Request showing the image and diffs (if any).
Prerequisites
Before starting this tutorial, ensure you have:
- A GitHub repository with GitHub Actions enabled
- Created Client Credentials for the Webshot Archive API
- A project set up in the Webshot Archive dashboard
- Node.js and npm/pnpm installed locally
What you'll learn
This tutorial will guide you through:
- Setting up Cypress to capture screenshots
- Running Cypress tests with GitHub Actions
- Configuring the Webshot Archive GitHub Action
- Validating screenshots on GitHub PRs
- Setting up automated screenshot comparison
Quick Start
If you already have Cypress or another test runner configured, you can skip to Step 7: Configure GitHub Actions.
For comparison screenshots, you need a main branch with screenshots already uploaded to the Webshot Archive API. Your first PR won't have comparisons, but after merging, future PRs will show diffs against the main branch.
Cypress Configuration
Step 1 - Install Cypress
Install Cypress as a development dependency:
pnpm add -D cypress
This tutorial uses pnpm as the package manager. If you're using npm, replace pnpm with npm in all commands.
Step 2 - Initialize Cypress
Run the Cypress setup command to create the initial configuration:
npx cypress open
This will create a cypress.config.ts file and the necessary folder structure.
Step 3 - Configure Cypress
Update your cypress.config.ts file:
import { defineConfig } from 'cypress';

export default defineConfig({
  e2e: {
    baseUrl: 'http://localhost:3000', // Update to match your development server
    screenshotsFolder: 'dist/cypress',
    video: false, // Disable video recording to speed up tests
    viewportWidth: 1280,
    viewportHeight: 720,
  },
});
Step 4 - Create a Test File
Create your first screenshot test:
describe('Screenshot Tests', () => {
  it('should capture homepage screenshot', () => {
    cy.visit('/');

    // Wait for any animations or loading to complete
    cy.wait(1000);

    // Capture full page screenshot
    cy.screenshot('homepage', {
      capture: 'fullPage',
    });
  });

  it('should capture mobile viewport screenshot', () => {
    cy.viewport('iphone-x');
    cy.visit('/');

    cy.wait(1000);

    cy.screenshot('homepage-mobile', {
      capture: 'fullPage',
    });
  });
});
Step 5 - Setup Build Scripts
Add the necessary scripts to your package.json:
{
  "scripts": {
    "dev": "your-dev-server-command",
    "build": "your-build-command",
    "cypress:open": "cypress open",
    "cypress:run": "cypress run --e2e",
    "cypress:e2e": "start-server-and-test dev http://localhost:3000 'cypress run --e2e'"
  },
  "devDependencies": {
    "cypress": "^13.0.0",
    "start-server-and-test": "^2.0.0"
  }
}
The start-server-and-test package automatically starts your development server before running tests. Install it with pnpm add -D start-server-and-test.
Step 6 - Test Locally
Run your tests locally to verify everything works:
pnpm run cypress:e2e
After running, check that screenshots are generated in the dist/cypress folder. Add this folder to your .gitignore:
# Cypress screenshots
dist/cypress/
cypress/screenshots/
cypress/videos/
GitHub Actions Configuration
Step 7 - Configure GitHub Actions
Create two workflow files for handling screenshots on pull requests and main branch pushes.
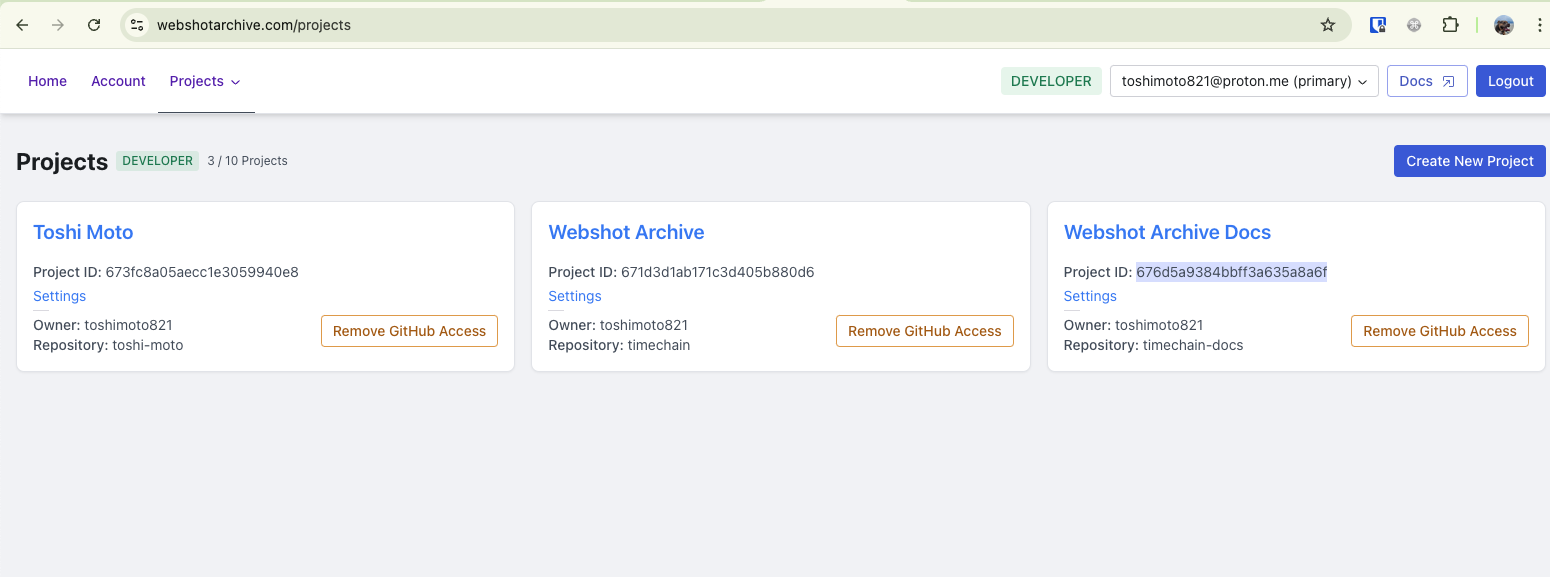
Note: You will need your
projectIdfor the GitHub Action configuration.
You can retrieve your Project ID from the Webshot Archive Projects page.
See the highlighted area in the screenshot below:
Pull Request Workflow
name: Pull Request Screenshots

on:
  pull_request:
    branches: [main]

jobs:
  screenshots:
    runs-on: ubuntu-latest
    steps:
      - name: Checkout code
        uses: actions/checkout@v4
        with:
          fetch-depth: 0

      - name: Setup Node.js
        uses: actions/setup-node@v4
        with:
          node-version: 20

      - name: Setup pnpm
        uses: pnpm/action-setup@v2
        with:
          version: 8

      - name: Install dependencies
        run: pnpm install --frozen-lockfile

      - name: Build application
        run: pnpm run build

      - name: Run Cypress tests
        run: pnpm run cypress:run
        continue-on-error: true
        id: screenshots

      - name: Upload screenshots to Webshot Archive
        uses: webshotarchive/github-[email protected]
        with:
          screenshotsFolder: dist/cypress
          clientId: ${{ secrets.WSA_CLIENT_ID }}
          clientSecret: ${{ secrets.WSA_CLIENT_SECRET }}
          projectId: # Add your project ID

      - name: Fail if screenshots failed
        if: steps.screenshots.outcome == 'failure'
        run: exit 1
Main Branch Workflow
name: Main Branch Screenshots

on:
  push:
    branches: [main, master]

jobs:
  screenshots:
    runs-on: ubuntu-latest
    steps:
      - name: Checkout code
        uses: actions/checkout@v4
        with:
          fetch-depth: 0

      - name: Setup Node.js
        uses: actions/setup-node@v4
        with:
          node-version: 20

      - name: Setup pnpm
        uses: pnpm/action-setup@v2
        with:
          version: 8

      - name: Install dependencies
        run: pnpm install --frozen-lockfile

      - name: Build application
        run: pnpm run build

      - name: Run Cypress tests
        run: pnpm run cypress:run
        continue-on-error: true
        id: screenshots

      - name: Upload screenshots to Webshot Archive
        uses: webshotarchive/github-[email protected]
        with:
          screenshotsFolder: dist/cypress
          clientId: ${{ secrets.WSA_CLIENT_ID }}
          clientSecret: ${{ secrets.CLIENT_SECRET }}
          projectId: # Add your project ID

      - name: Fail if screenshots failed
        if: steps.screenshots.outcome == 'failure'
        run: exit 1
Step 8 - Configure GitHub Secrets
Add the following secrets to your GitHub repository (Settings → Secrets and variables → Actions):
CLIENT_ID: Your Webshot Archive client IDCLIENT_SECRET: Your Webshot Archive client secretPROJECT_ID: Your Webshot Archive project ID
GitHub Action Configuration Options
Required Parameters
| Parameter | Description | Example |
|---|---|---|
screenshotsFolder | Path to folder containing screenshots | dist/cypress |
clientId | Your Webshot Archive client ID | 123... |
clientSecret | Your Webshot Archive client secret | 456... |
projectId | Your Webshot Archive project ID | 789... |
Optional Parameters
| Parameter | Description | Default |
|---|---|---|
comments | Enable/disable PR comments | true |
For advanced configuration options, see the API Documentation.
Webshot Archive Github action
Step 9 - Install the Github Action
In order for Webshot Archive to be able to comment on the PR you will need to install the Webshot Archive GitHub Action. This gives Webshot Archive the following permissions:
Read and write access to pull requests- For commenting on pull requests with image diffsRead access to metadata- Default for any Github AppRead access to content- To view branches and commits in the Webshot Archive Dashboard UI
Testing Your Setup
Step 10 - Create a Test PR
- Create a new branch and make a small change
- Push the branch and create a pull request
- The GitHub Action will automatically run and upload screenshots
- Check the PR comments for screenshot results
Expected Results
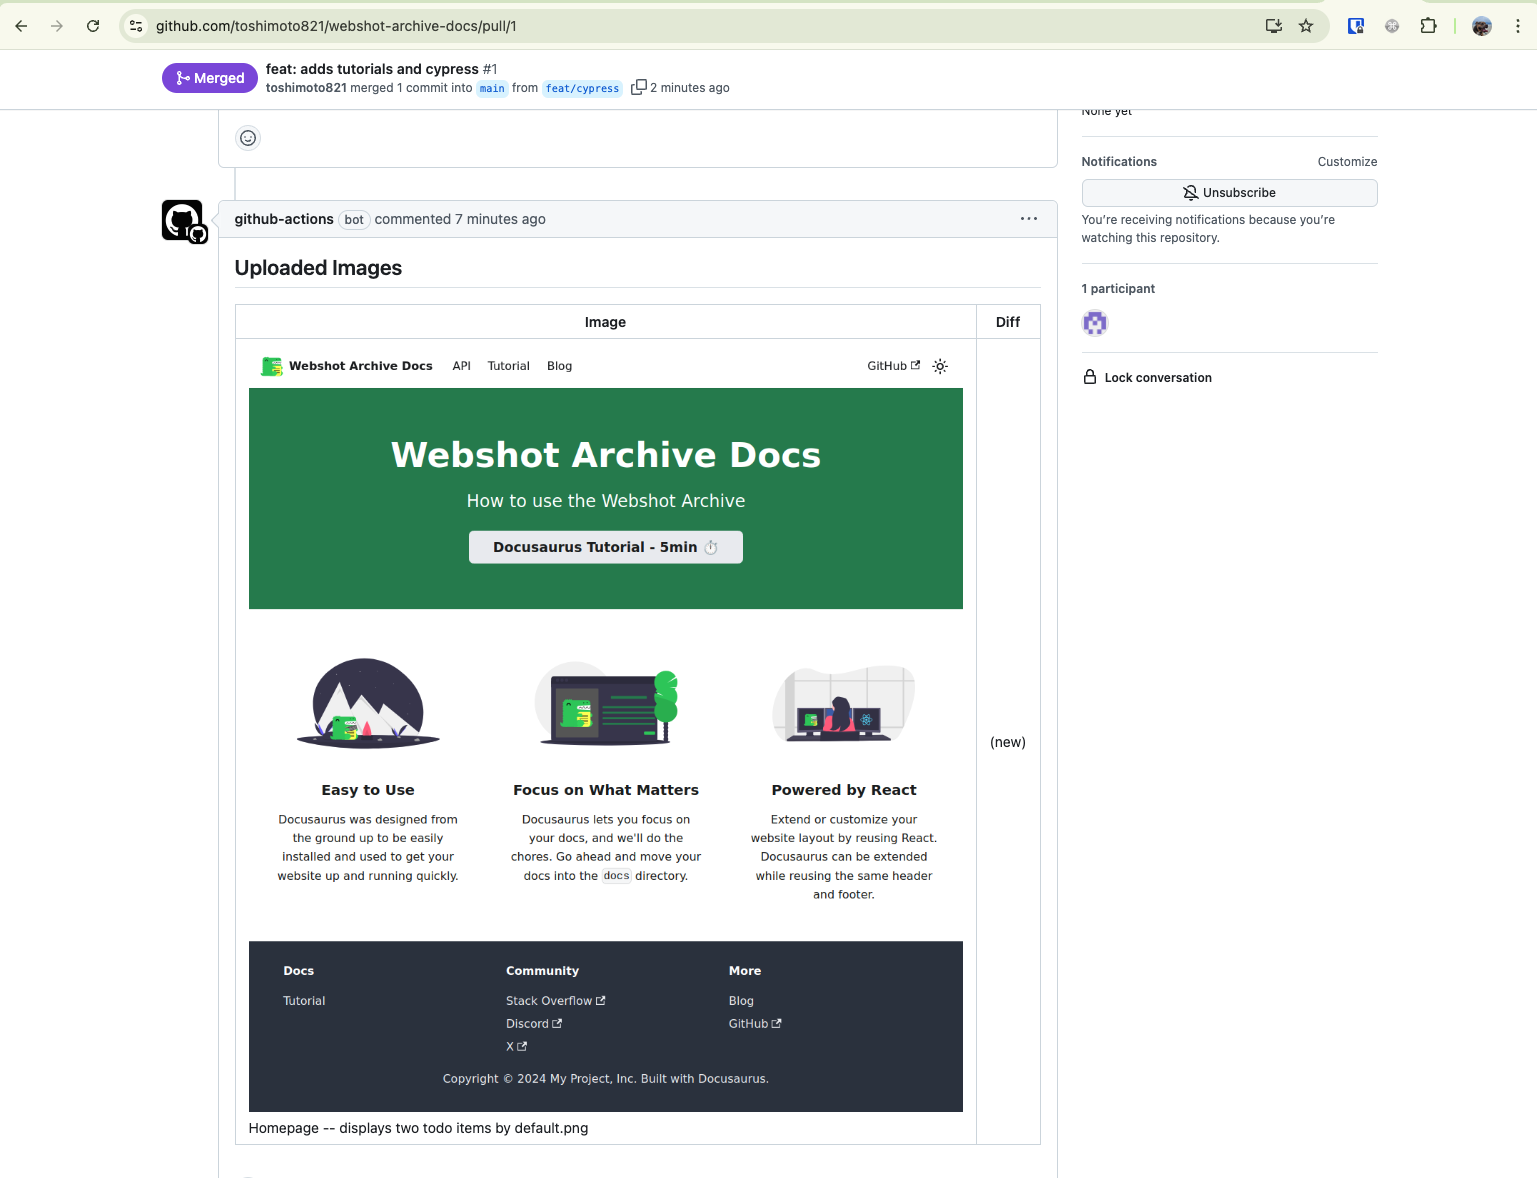
First PR (No Comparison)
Your first PR will show new screenshots without comparisons:
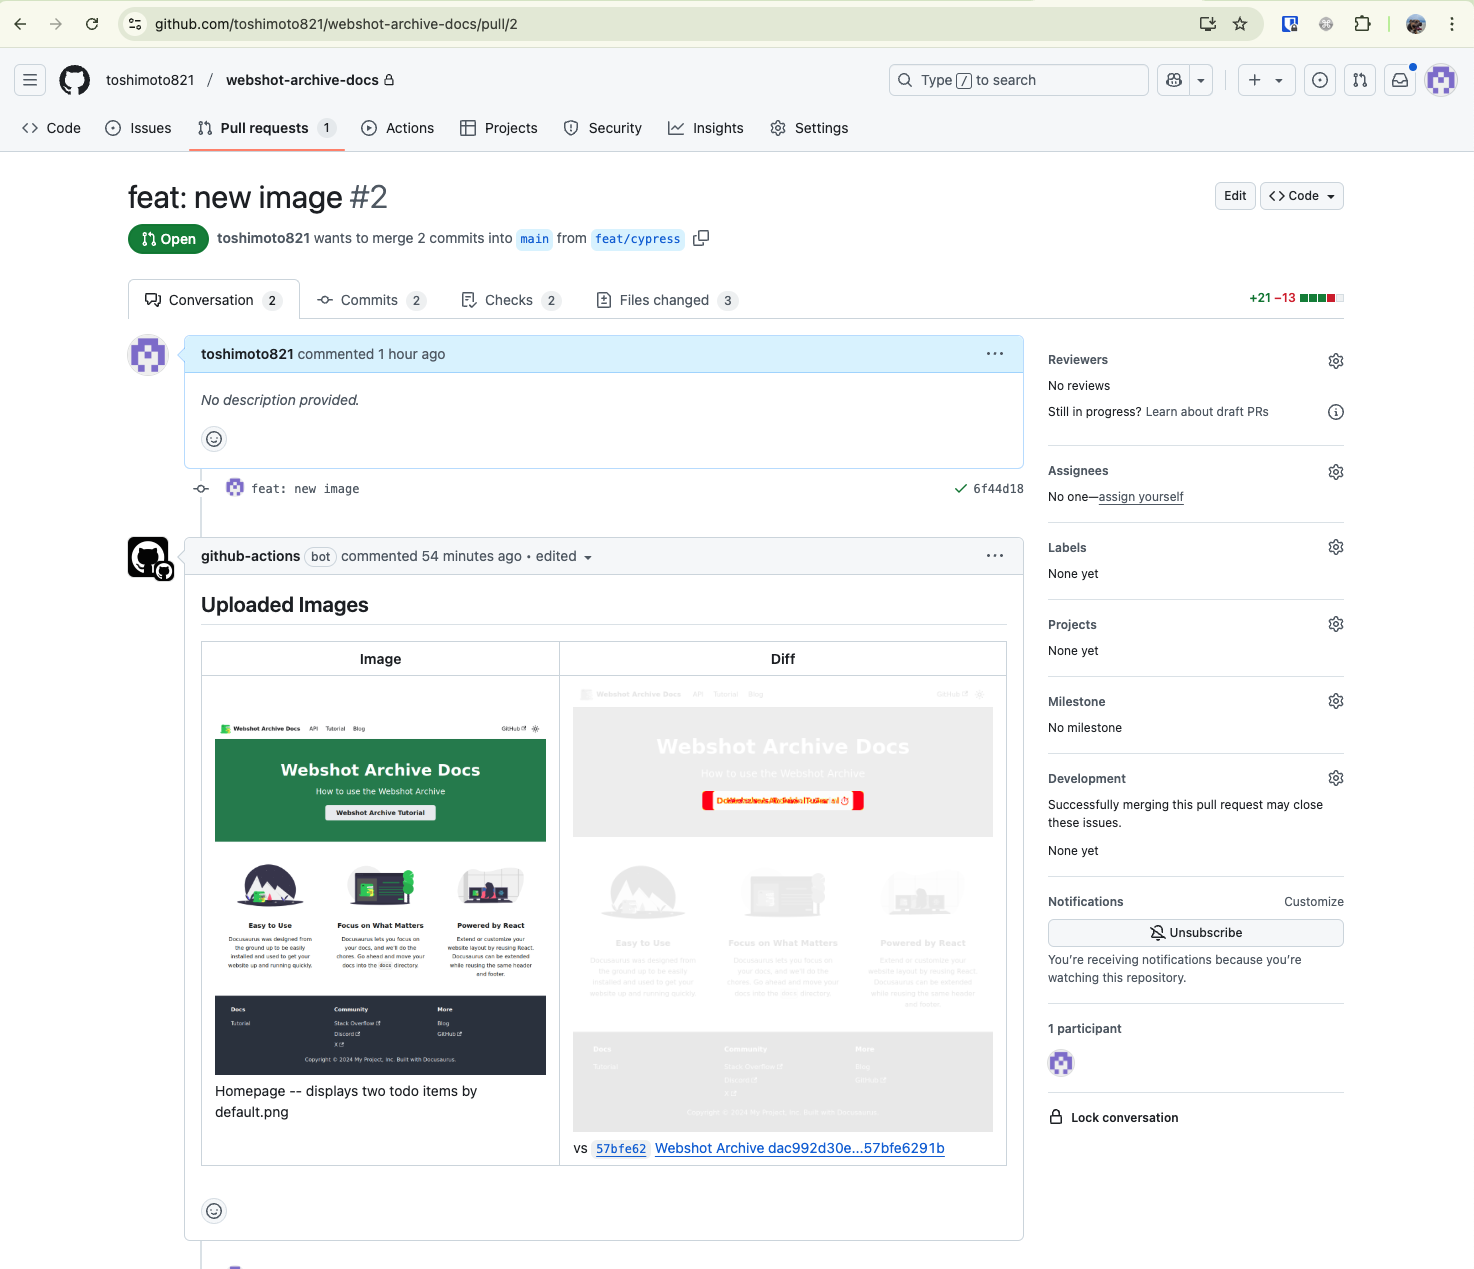
Subsequent PRs (With Comparison)
After merging your first PR, future PRs will show comparisons with the main branch:
Troubleshooting
Common Issues
Screenshots not uploading:
- Verify all GitHub secrets are correctly set
- Check that the
screenshotsFolderpath matches your Cypress configuration - Ensure your project ID is correct in the Webshot Archive dashboard
Tests failing in CI:
- Add
continue-on-error: trueto the screenshot step to see results even if tests fail - Check that your application builds and runs correctly in the CI environment
- Verify your
baseUrlin Cypress config matches your CI setup
No comparison screenshots:
- Ensure the main branch workflow runs successfully after merging your first PR
- Check that the same
projectIdis used in both workflows
Getting Help
- Post a question on Discord.
- Check the API Documentation for advanced configuration
Next Steps
Now that you have screenshot testing set up, consider:
- Adding more comprehensive test scenarios
- Configuring different viewport sizes for responsive testing
- Setting up visual regression testing workflows
- Integrating with your existing CI/CD pipeline