Quick Start Guide
Get Webshot Archive up and running in your project in under 10 minutes.
Overview
This guide will walk you through:
- Creating a Webshot Archive account and project
- Setting up authentication credentials
- Installing the required GitHub App
- Configuring a basic GitHub Actions workflow
- Running your first visual regression test
Step 1: Create Your Account
- Go to webshotarchive.com
- Click "Sign Up" and create your account
- Verify your email address
You may request access to a GUEST account with limited access to evaluate Webshot Archive
Step 2: Create a Project
- After signing in, click "Create Project"
- Give your project a name (e.g., "My Web App")
- Choose a description (optional)
- Click "Create Project"
You'll be taken to your project dashboard where you can see your project ID and settings.
Step 3: Set Up Authentication
You need to create API credentials for GitHub Actions to upload screenshots.
3.1 Create Service Account
- Go to your Account Settings
- Click "Add User" → "Add Service Account User (GitHub Actions)"
- Click "Add Service Account"
3.2 Generate Credentials
- Find your service account in the users list
- Click "View / Add Credentials"
- Click "Create Credentials"
- Copy both the Client ID and Client Secret (you won't see the secret again!)
3.3 Add to GitHub Secrets
- Go to your GitHub repository
- Navigate to Settings → Secrets and variables → Actions
- Add these secrets:
WSA_CLIENT_ID= Your Client IDWSA_CLIENT_SECRET= Your Client SecretWEBSHOT_ARCHIVE_PROJECT_ID= Your Project ID
Step 4: Set Up Screenshot Capture
Choose your testing framework:
Option A: Playwright (Recommended)
# Install Playwright
pnpm add -D @playwright/test

# Initialize Playwright
npx playwright install
Create a test in tests/visual.spec.js:
const { test, expect } = require('@playwright/test');

test('visual regression tests', async ({ page }) => {
  await page.goto('http://localhost:3000');
  await page.waitForTimeout(1000);
  await page.screenshot({ path: 'screenshots/homepage.png' });

  await page.goto('http://localhost:3000/about');
  await page.waitForTimeout(1000);
  await page.screenshot({ path: 'screenshots/about-page.png' });
});
Option B: Cypress
If you don't have Cypress set up:
# Install Cypress
pnpm add -D cypress

# Initialize Cypress
npx cypress open
Create a basic test in cypress/e2e/visual.cy.js:
describe('Visual Regression Tests', () => {
  it('should capture homepage screenshot', () => {
    cy.visit('http://localhost:3000');
    cy.wait(1000); // Wait for any animations
    cy.screenshot('homepage');
  });

  it('should capture about page screenshot', () => {
    cy.visit('http://localhost:3000/about');
    cy.wait(1000);
    cy.screenshot('about-page');
  });
});
Step 5: Install the GitHub App (Required)
⚠️ Essential Requirement: You must install the Webshot Archive GitHub App for Webshot Archive to function properly.
- Go to Webshot Archive GitHub App
- Click "Install"
- Select the repositories you want to use with Webshot Archive
- Click "Install" to complete the setup
This gives Webshot Archive the necessary permissions to:
- Read and write access to pull requests (for commenting on pull requests)
- React access to content (allows the app to view branches in the webshot arch)
- Read access to metadata
The GitHub App installation is now mandatory for Webshot Archive to work. Without it, the action will fail and screenshots will not be processed or uploaded.
Step 6: Create GitHub Actions Workflow
Create .github/workflows/visual-tests.yml:
This is an example workflow that assumes a typical React/Node.js setup. You'll need to adapt the commands, ports, and paths to match your specific project structure and build process.
name: Visual Regression Tests

on:
  pull_request:
    branches: [main]
  push:
    branches: [main]

jobs:
  visual-tests:
    runs-on: ubuntu-latest

    steps:
      - name: Checkout code
        uses: actions/checkout@v4
        with:
          fetch-depth: 0

      - name: Setup Node.js
        uses: actions/setup-node@v4
        with:
          node-version: '18'

      - name: Install dependencies
        run: pnpm install

      - name: Start application
        run: pnpm start &
        env:
          CI: true

      - name: Wait for app to be ready
        run: npx wait-on http://localhost:3000

      - name: Run visual tests
        run: pnpm playwright test
        continue-on-error: true

      - name: Upload to Webshot Archive
        uses: webshotarchive/github-[email protected]
        with:
          screenshotsFolder: playwright/screenshots # path may differ, configured in playwright.config.ts
          clientId: ${{ secrets.WSA_CLIENT_ID }}
          clientSecret: ${{ secrets.WSA_CLIENT_SECRET }}
          projectId: ${{ secrets.WSA_PROJECT_ID }}
Step 7: Test Your Setup
-
Start your application locally:
pnpm start -
Run your visual tests:
# For Playwright
pnpm playwright test

# For Cypress
pnpm cypress run -
Create a test pull request:
- Make a small change to your app
- Commit and push to a new branch
- Create a pull request
-
Check the results:
- The GitHub Action will run automatically
- You'll see a comment on your PR with visual diffs
- Visit your Webshot Archive dashboard to see the full history
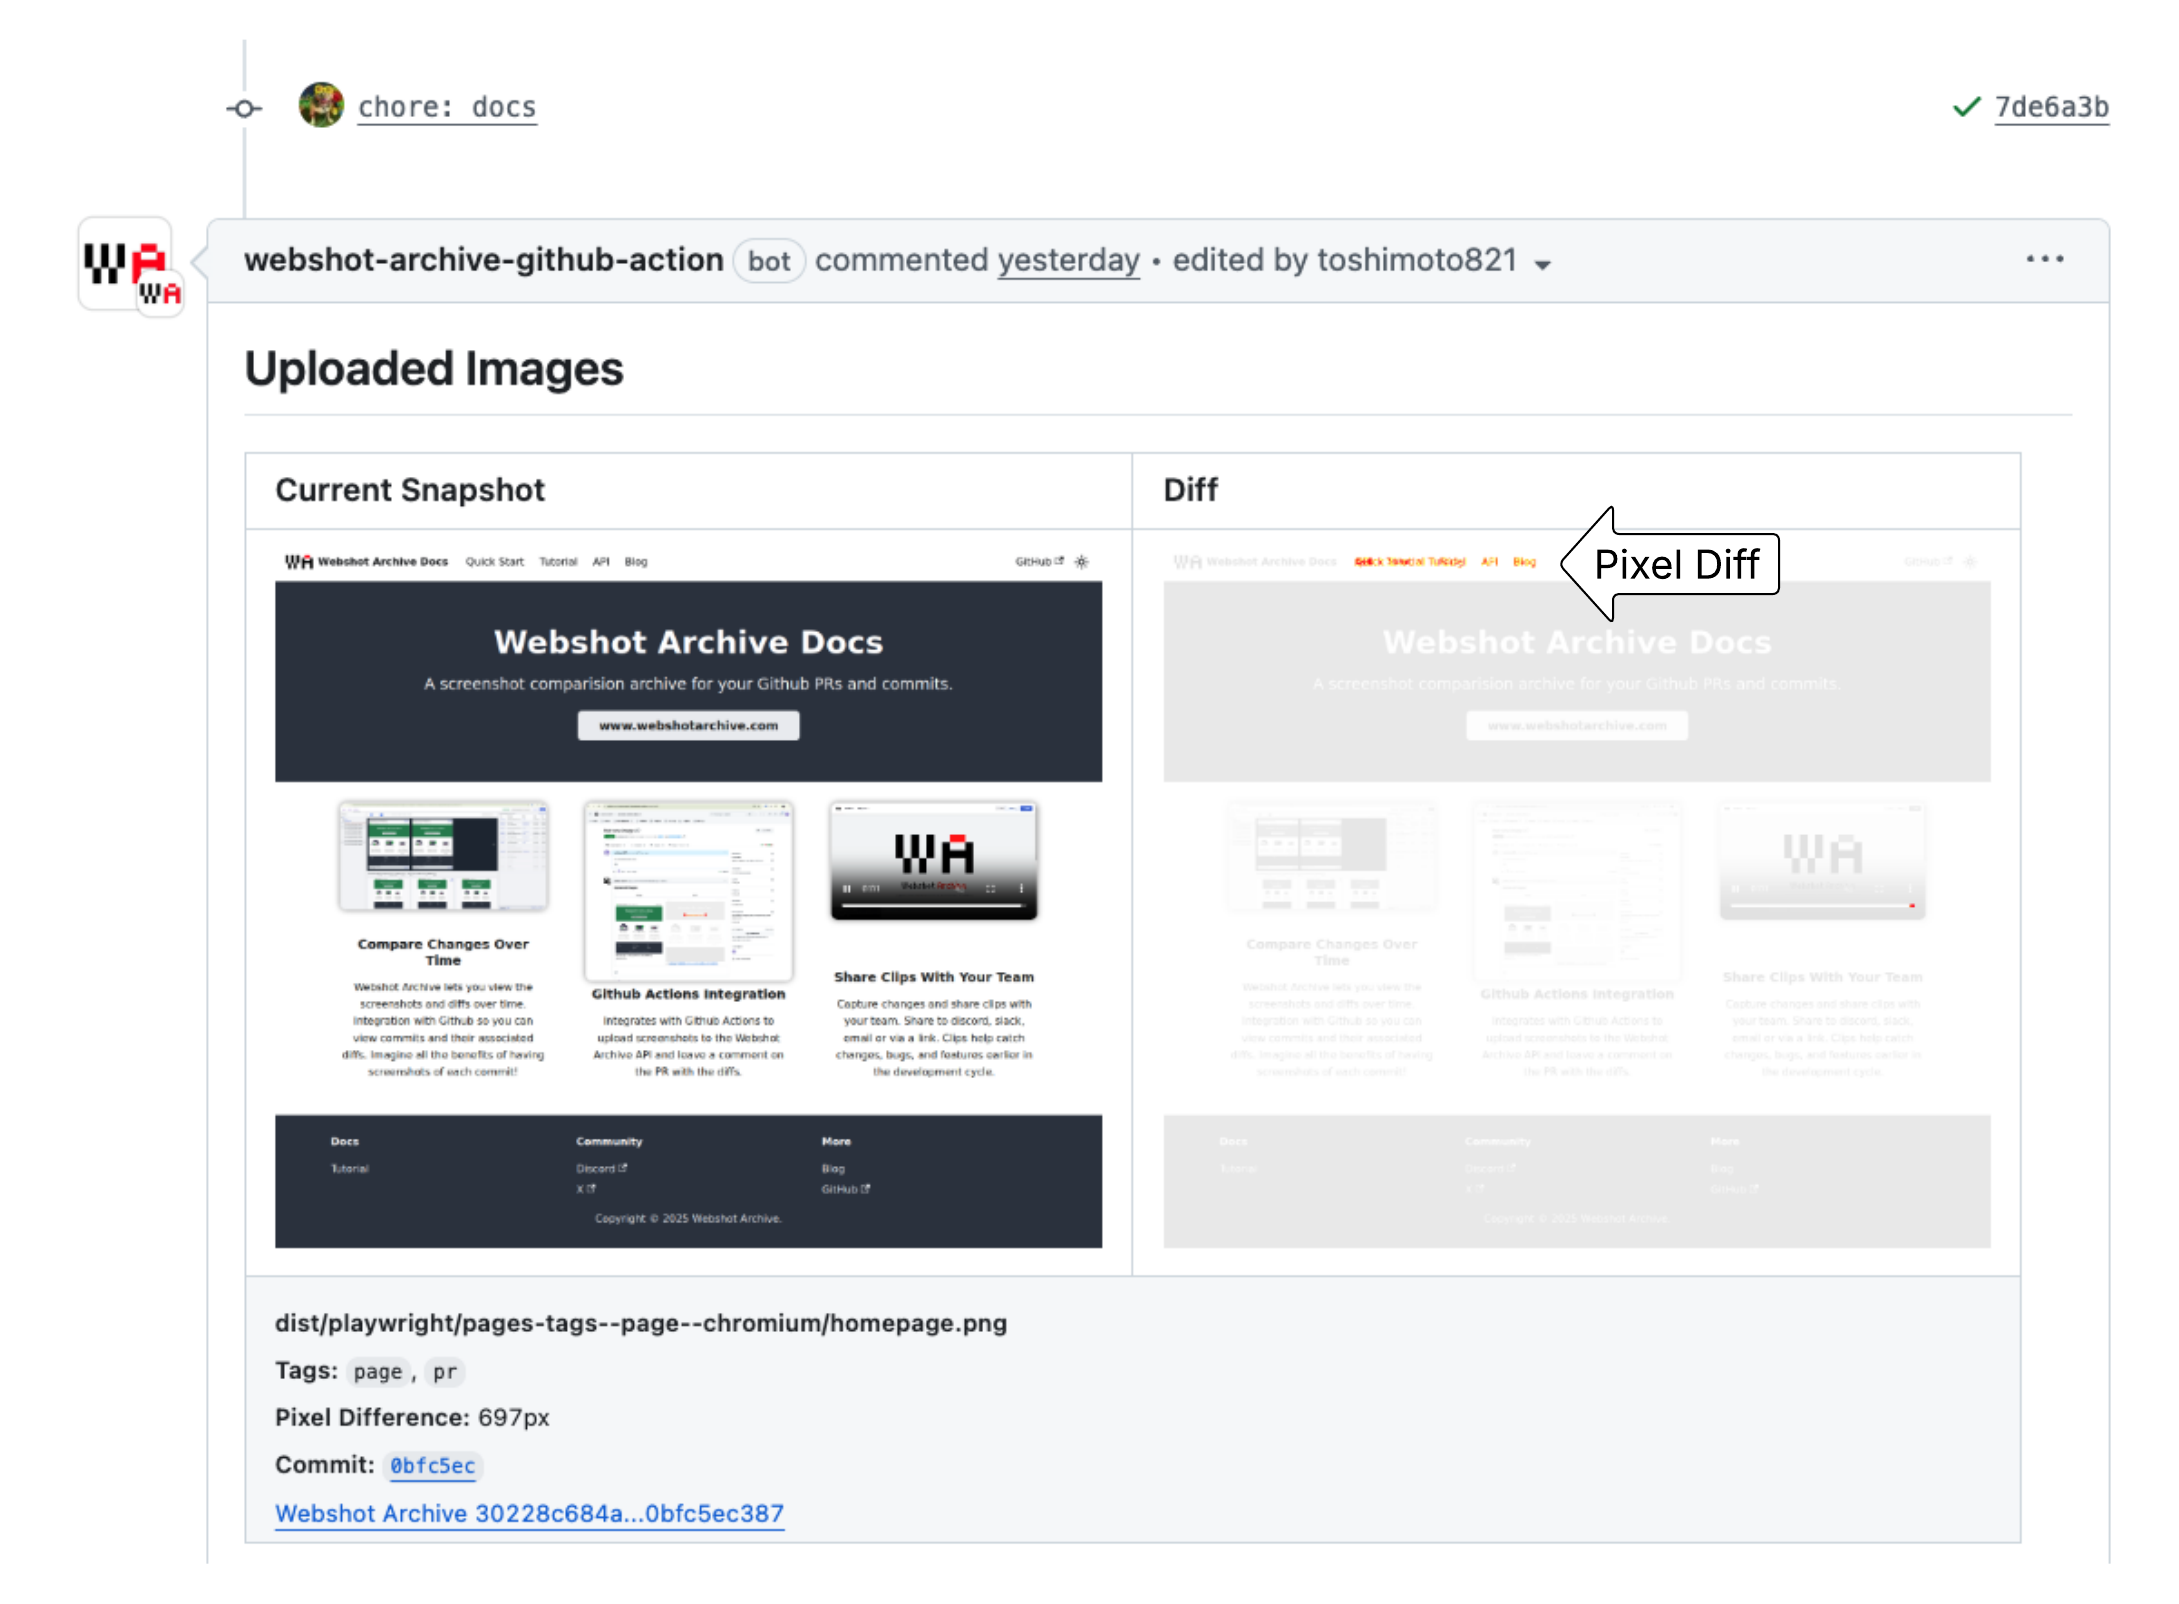
What You Should See
In GitHub Pull Request
- A comment with screenshots and visual diffs
- Only changed components highlighted
- Links to view full-size images
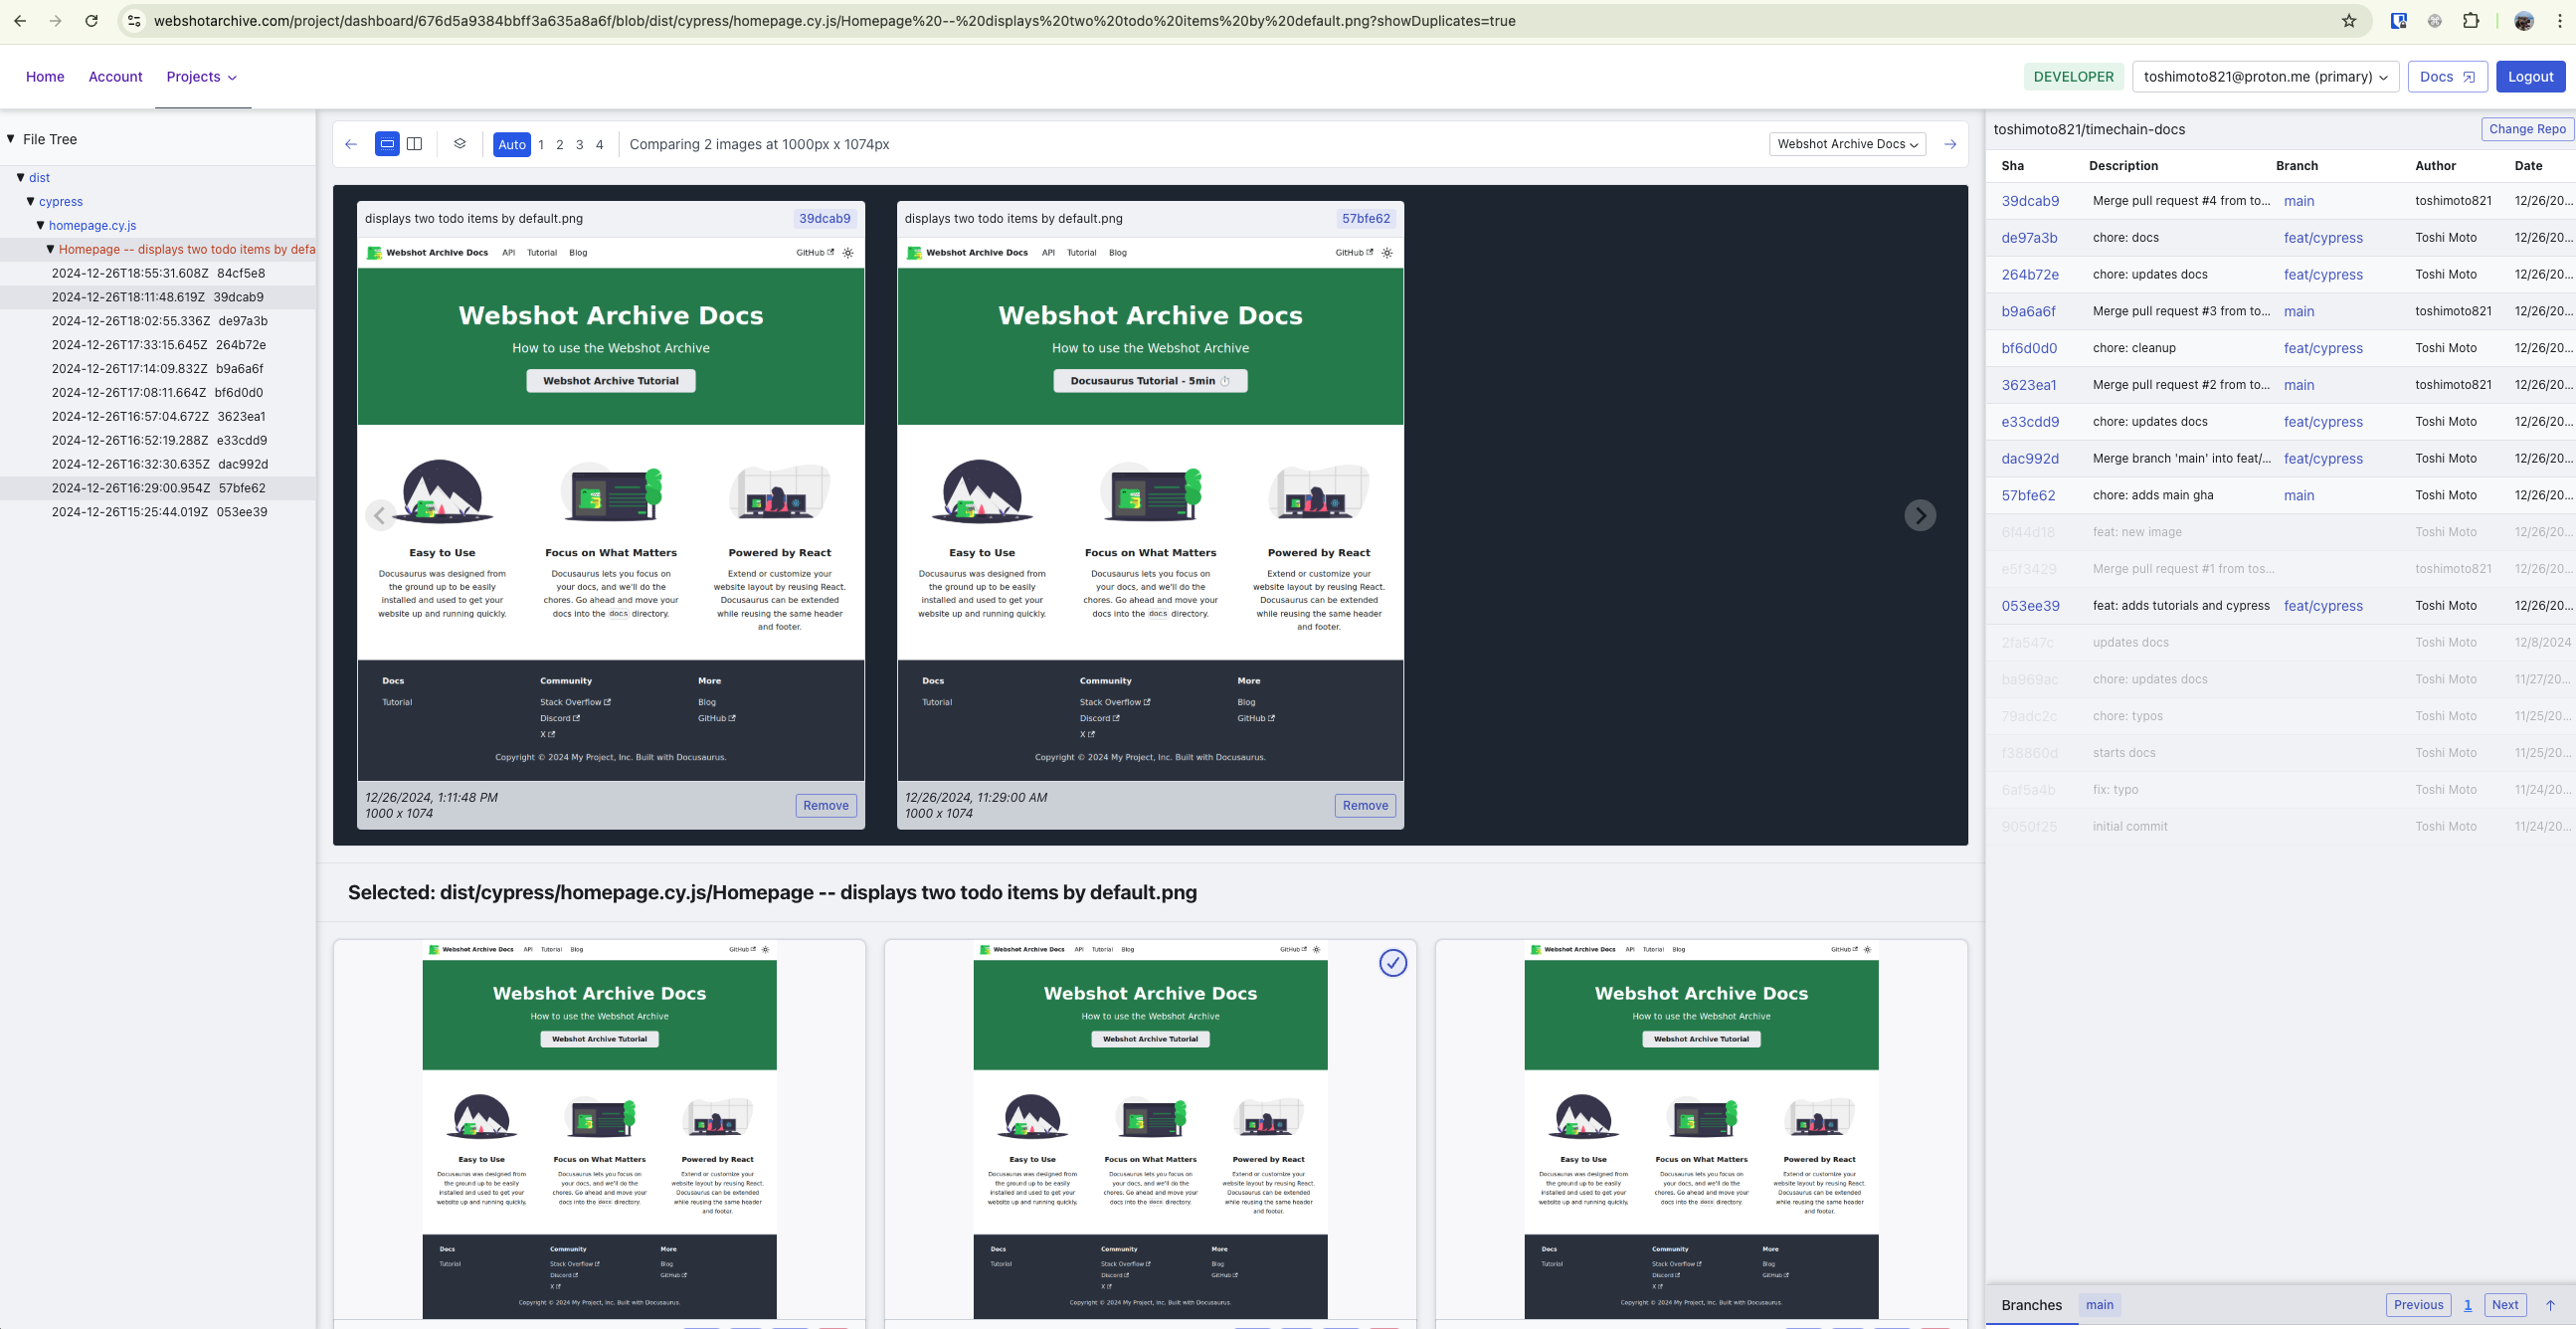
In Webshot Archive Dashboard
- Timeline of all visual changes
- Side-by-side comparisons
- Filtering by branch, commit, or tags
Troubleshooting
Common Issues
"Screenshots not found"
- Check the
screenshotsFolderpath in your workflow - Ensure your tests are actually generating screenshots
"Authentication failed"
- Verify your GitHub secrets are correctly named
- Check that the Client ID and Secret are copied exactly
"Action fails or screenshots not uploaded"
- Ensure the Webshot Archive GitHub App is installed on your repository
- Check that the app has proper permissions for your repository
"No diffs shown"
- This is normal for the first run - there's nothing to compare against
- Make a visual change and create another PR to see diffs
Getting Help
- Check the troubleshooting guide
- Join our Discord community
- Open an issue on GitHub
Need help? Join our Discord or check the troubleshooting guide.